Objectives & prerequisites
In this unit you will use the command-line to:
- Create a new DDEV environment, selecting appropriate environment type and settings
- Inspect a DDEV environment's directory structure
- Change a DDEV environment's basic configuration options
- Troubleshoot HTTP port issues
- Stop/start/restart a DDEV environment
- Learn more about a DDEV environment
- Basic command-line usage
- Having Docker + DDEV installed locally
Step 1: Create a directory for your environment
Each environment needs its own directory. A common scenario is to use a dedicated projects directory that will hold each of your projects:
cd ~/projects
mkdir demo
cd demo
Step 2: Initialize your environment
→ Inside ~/projects/demo/:
ddev configThe ddev config command initializes a new environment, and will start by asking you a set of questions:
- Project name
- Docroot
- Project type
Project name
The suggested project name is based on the name of your directory, and will be used by default in your project's URL.
Example
if you keep "demo" as your project name, your project URL will be https://demo.ddev.site, unless you change that configuration later.
Docroot
Your environment's docroot is the directory that contains (or will contain) your web application. In other words, it's the directory from where your site is served.
Typical name choices for docroot directories are docroot, htdocs, public_html, public, and web.
For Drupal sites, the name web is often used, and it's always good to be consistent with community practices, but ultimately the name you choose here is up to you.
Example
If you choose web as your docroot, DDEV will create the ~/projects/demo/web/ directory. If it already exists, you will be asked for confirmation before the directory's contents is overwritten.
Project type
DDEV supports a number of project types, including PHP (generic), Python (generic, experimental), Drupal, Wordpress, Typo3, and more.
If you just need an environment for static HTML and/or JavaScript, choose the generic PHP project type.
The difference between the project types lies mostly in where configuration files are placed, which is different for each CMS.
→ Choose drupal10 to initialize a D10 environment.
If everything went well, you should see the following message:
Configuration complete. You may now run 'ddev start'. Shared directories between host and container
Before we go on, let's take a step back and look at how your Host OS and your container(s) share data with each other.
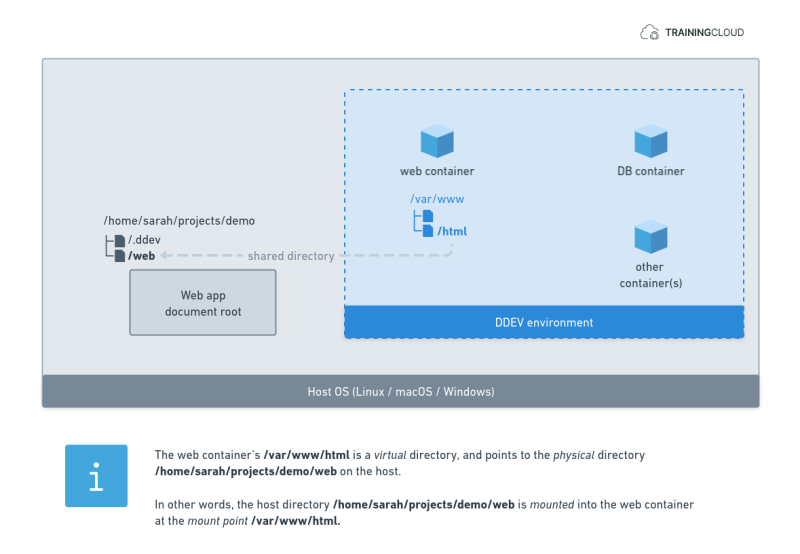
When you create a new DDEV environment, you're asked to specify the environment's docroot. The web server inside the web container needs to know this so it can serve the application correctly.
When you start your environment, DDEV mounts your docroot directory into the web container at the mount point /var/www/html.
As a result, when you enter into your web container with ddev ssh and you find yourself inside your web container's /var/www/html directory, you're actually inside your docroot: /var/www/html acts like a virtual directory that points to a physical directory on your Host OS.
Your web container acts like a fully independent server - it thinks it's a real server, and does not realise it's a virtualized server running inside another machine, the Host.
When your application's docroot on the Host is mounted into the web container at /var/www/html, the container does not know or care that the actual physical directory is located elsewhere. As far as the container is concerned, /var/www/html is a normal directory and contains the code it needs to serve the application.
The container is not aware of any other directories on the Host and you cannot "escape" that directory: if you're inside the container at /var/www/html and you run cd .. to go to the parent directory, you end up in /var/www, not in the docroot's parent directory on the host.
It's important to really understand how the Host's file system and the container's file system are two separate things. They are almost entirely unconnected and invisible to each other, except for the shared docroot directory (and other directories you may have chosen to share).
Where to run DDEV commands
You can run many of DDEV's commands both inside and outside your environment directory.
Outside the environment directory
If you run a DDEV command outside an environment directory, you need to specify the environment's name.
Example:
In ~/projects:
ddev start demoInside the environment directory
If you run a DDEV command inside a project directory, you do not need to provide the project name:
Example:
In ~/projects/demo:
ddev startStep 3: Review environment & config options
At this point DDEV will have created the following directory structure:
demo/
├── .ddev/
│   ├── addon-metadata/
│   ├── db-build/
│   ├── web-build/
│   ├── web-entrypoint.d/
│   ├── config.yaml
│   └── .gitignore
└── web/
   └── sites/
The .ddev directory is marked as hidden (starts with a dot), and contains (or will contain) all configuration files related to your environment.
You can manage all of your DDEV environment's basic config options in .ddev/config.yaml. For now you can completely ignore all other files and directories inside the .ddev directory.
In fact, unless you need to manually override or add Docker container environments for more complex or custom environments, .ddev/config.yaml is likely the only config file you will work with.
Activity 1
→ Open .ddev/config.yaml and have a look at its contents.
The first 15 lines or so are a combination of default settings and the answers you gave when asked by ddev config. The rest of the items are commented out, so will remain inactive until you remove the # comment sign.
At this point, go over the active and inactive configuration items, and get a sense of what kind of things you can configure here.
There's a lot you won't be familiar with. That's ok. If you're curious, learn more about each option in the official config options documentation.
Step 4: Start your environment
Run ddev start to boot up your new environment.
If this is the first time you set up a DDEV environment, or it has been a long time since you last did so, DDEV may need a few minutes to download the newest Docker container images it needs.
If everything went well, you should see a message similar to:
Successfully started demo
Project can be reached at https://demo.ddev.site https://127.0.0.1:32802
Note that you haven't installed any web application yet. If you were to navigate to https://demo.ddev.site, there would be nothing of interest to see yet.
Troubleshooting port conflicts
A common problem people encounter at this point is a port conflict:
Failed to start demo: unable to listen on required ports, port 80 is already in use.This may happen if an application other than DDEV is already listening on port 80 - the standard HTTP port - for incoming requests.
Likely candidates are other local development environments (Lando, Docksal, MAMP/WAMP/XAMP), or you may be unknowingly running a web server such as Apache or Nginx running on your Host OS .
As only one application at a time can listen on a given port, you need to either find and shutdown the other application, or change your DDEV environment's configuration to listen on another port.
The most straightforward solution is to change the HTTP port on which this DDEV environment should listen.
You should be able to use any port number above 1024, but we suggest:
- Stay in the 8000 range, as that's a bit of a convention for web-related services.
- Avoid 8000, 8080, 8089, 8888, 8889 as they are often used by other applications.
- Don't use 8025 or 8026, as they can be used by other DDEV services
There are two ways to change basic DDEV config options: via the ddev config command (which modifies config,yaml), or by manually editing config.yaml.
Changing the HTTP port via ddev config
ddev config --http-port=8851Warning:
At the time of writing, DDEV version 1.22.7 does not behave correctly when you use it to configure a single value like --http-port as shown above.
If you want to learn more, read the issue description on Github.
If you're on DDEV version 1.22.7 or below, we recommend you only use the ddev config command for the initial creation of your environment, and make all configuration changes manually in config.yaml.
Changing the HTTP port manually in config.yaml
Edit .ddev/config.yaml, add the following item (or copy it from the commented items), and save the file:
router_http_port: 8851
If you have stopped the conflicting app or changed your config.yaml file, and tried to restart your DDEV environment without success, try turning it completely off and then on again:
In ~/projects/demo/:
ddev poweroff
ddev start
For more ways to solve port conflicts, see: https://ddev.readthedocs.io/en/stable/users/usage/troubleshooting/#web-server-ports-already-occupied
For more information on the ddev config command, see:
https://ddev.readthedocs.io/en/stable/users/usage/commands/#config
Step 5 - Learn more about your environment
You can use ddev describe or ddev status (its alias) to learn more about the active containers and the services they expose.
Example
In ~/projects/demo/:
ddev statusYou should see something similar to this screenshot:
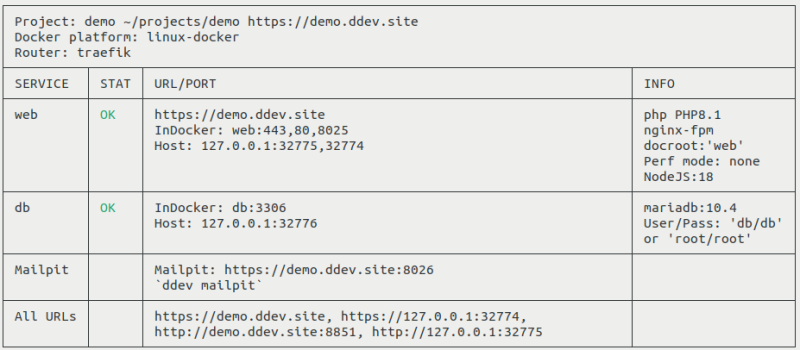
This report informs you that:
- 3 services are active: a web server, a database server, and Mailpit (catches outgoing email)
- The currently active web server is nginx-fpm, using PHP 8.1, and serving from the web directory.
- The currently active database server is MariaDB 10.4, and you can log in as "db" (application user) or as "root" (superuser).
- You can reach your project via 4 different URLs (but you'll typically only use the first one: https://demo.ddev.site)
Demo
Activity 2
- Paste the Mailpit address in your browser's address bar and have a look at the application.
- Run the
ddev mailpitcommand
Can you detect any difference between the two methods to launch Mailpit?
No, the ddev mailpit command is a convenience command, like ddev launch.
You don't have to use the command, but if you frequently switch between DDEV environments, these convenience commands can save time and effort.
Activity 3
- Run
ddev status. You will need the output in a later stage of this activity. - Run
ddev --helpto find the right command to stop your DDEV environment. - Stop your DDEV environment.
- Run
ddev statusand compare its output with the previous time you ran it.
Does the output reflect that the environment is stopped?
If you correctly stopped the environment, the list of services and URLs should be empty.
Activity 4
Find the right command to restart your DDEV environment.
ddev restartFinal note
At this point your DDEV environment should be ready for the next step: setting up a web application.
Summary
- Create a new project directory, and run
ddev configinside it.- Provide project name, type, and docroot directory
- Start your DDEV environment with
ddev start - Stop your DDEV environment with
ddev stop. - Restart your DDEV environment with
ddev restart. - Configure your environment in two ways:
- via
ddev config --name-of-option="some value". - by directly editing
.ddev/config.yaml.
- via
- Be aware of the config-related bug in DDEV 1.22.7.
- Get your DDEV environment's status information with
ddev status. - When running commands from outside a DDEV project directory, provide the name of the environment you want to act upon.