In this unit:
- How Block Views differ from Page Views.
- How to select and configure individual fields
- How to choose between 'Show: Content' and 'Show: Fields'
- How to expose views configuration options as block configuration options
In a previous section you learned what views are and how to create a view with a page display, also called page view.
In this section we'll look at creating a views with block displays, also called block views.
The process of creating a block view is almost identical to creating a page view. The only difference is that the end result - the data retrieved from the database - will be made available as a block, ready for you to place in any available theme region.
Initial view creation
You can create a new block view via the 'Add view' button at Manage > Structure > Views:
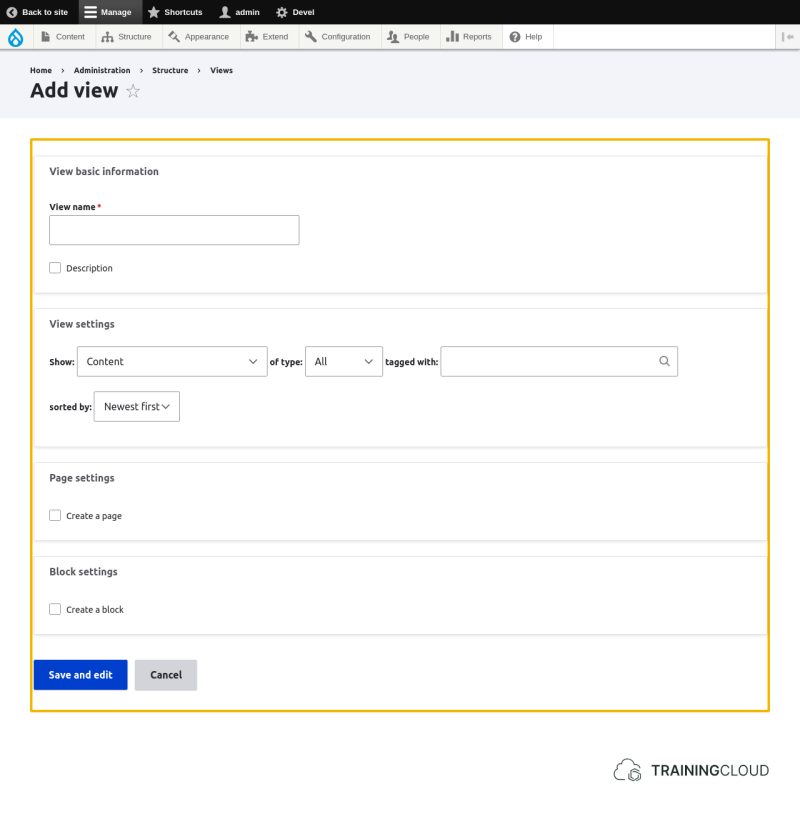
Select:
- Which type of data you want to retrieve from the database
- Which type of display to create (block)
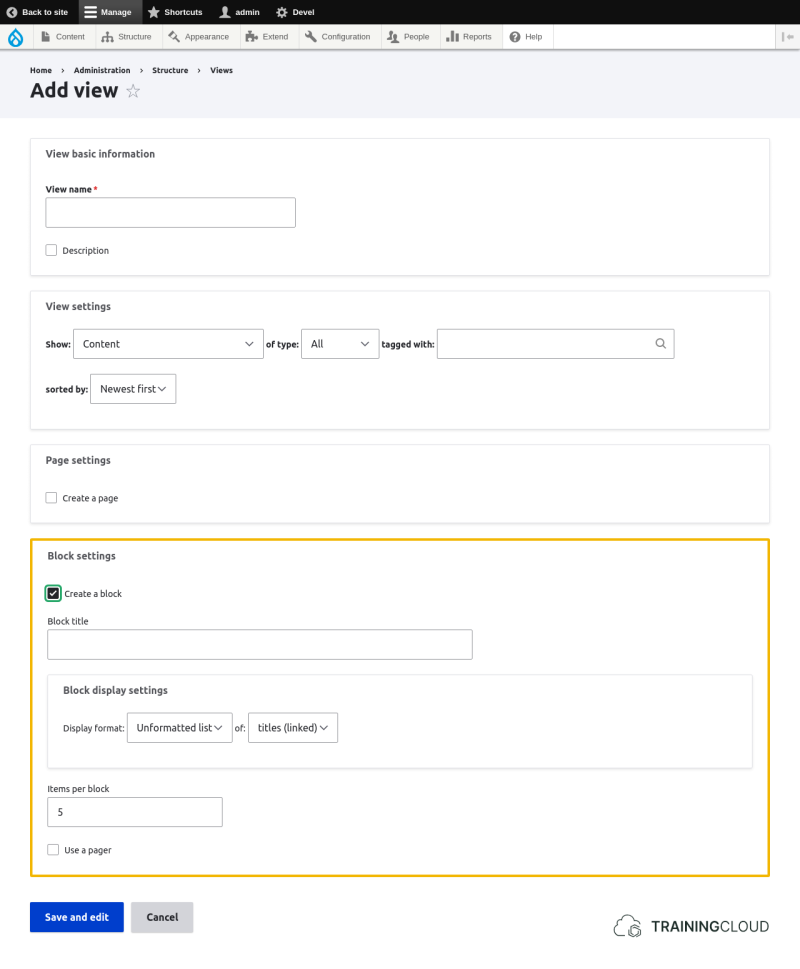
In the block settings, finish the initial wizard by providing a block title and number of items to show per block. You can still change all these details later on the view's extended configuration page.
Activity 1
- Create a block view of articles.
- Name it 'Recent articles'
- Leave all other options as they are
- Save the block, navigate to the Block Layout configuration and place your new block in the sidebar region.
After completing Activity 1 you will notice a few differences in the block view's administration interface compared to page views:
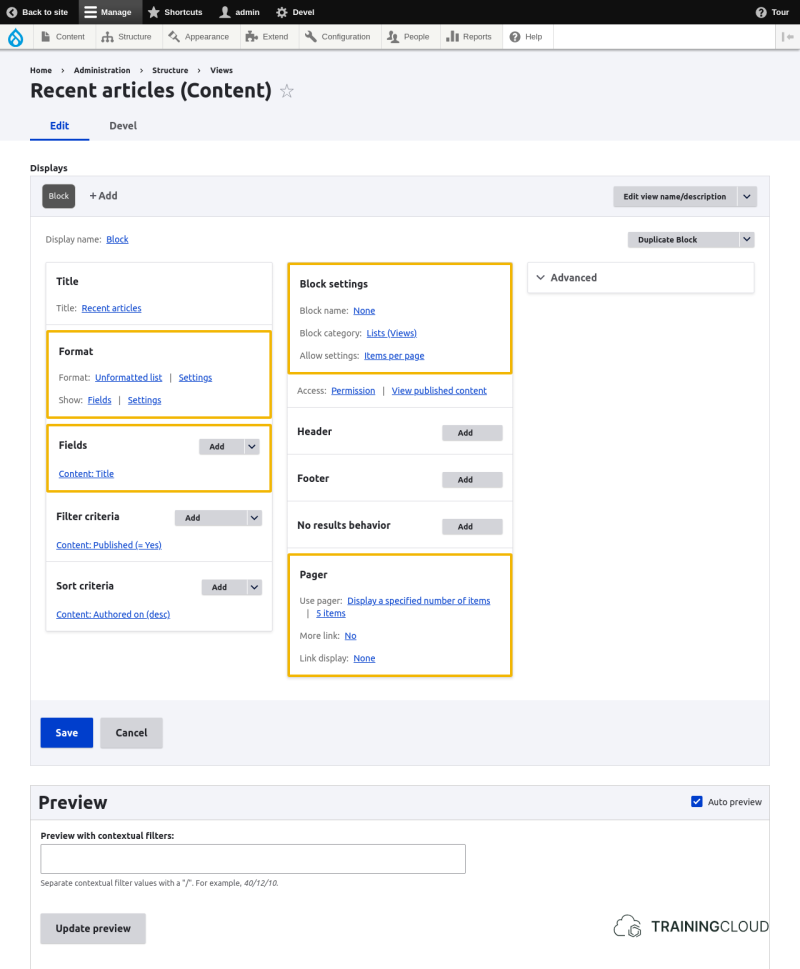
- In the 'Format' section, 'Show: fields' is selected.
- The 'Fields' section is no longer grayed out, and lists one field ('title')
- The 'Block settings' section has replaced the 'Page settings' section
- The 'Pager' section is configured to show 5 items at a time.
'Show: Fields' vs 'Show: Content'
There are two main ways of formatting the data a view retrieves: 'Show: Content' and 'Show: Fields'. This applies to Page Views, Block Views, and other more advanced types of views.
'Show: Content'
Lets you use one of the available view modes to show the content entities you retrieved, such as 'Default' or 'Teaser'.
→ refer to the chapter on working with content types for a refresher on how Content Types and View Modes relate to each other.
This is the equivalent of stating "I've already configured how I want my Articles to look in the 'Default' and 'Teaser' view modes. Please use those settings when showing the Articles I retrieve in this view."
'Show: Fields'
Lets you specify exactly which fields to use when showing the content items you retrieve. This approach gives you more power and flexibility, but at the cost of having to do more work to build and maintain the view.
Power and Flexibility
Selecting and configuring individual fields gives you much more power than simply showing content entities using a display mode. You can modify the label and its placement, choose which html elements and classes should be used for each field, turn the data into links, and much more.
An additional benefit is that you can select fields and related data that is not available when choosing 'Show: Content', such as the ID of your content entity, date it was last updated, language (if you have set up multiple languages), workflow state, and more.
If having control over all aspects of your view is more important than easy of creation and maintenance, 'Show: fields' is often the better choice.
Maintainability
Let's say you build 5 very similar views this way. If you suddenly decide you want to add a field to all of them, or change how one field is displayed in all of them, you need to manually update all 5 views.
If you had built the same 5 views using 'Show: Content', you could have made the changes in the content type's display mode settings, and your 5 views would have been updated instantly
If maintainability and visual consistency across your site is an important requirement, then 'Show: content' is often a better choice.
Activity 2
- In your Recent Articles view:
- Change the Format options from 'Show: Fields' to 'Show: Content', and choose the 'Teaser' view mode.
- Scroll down to the preview area to see the difference.
- Change the Format options back to 'Show: Fields', using the default options when prompted.
Adding a Field
You can add fields via the 'Add' button in the Fields section, which opens up a dialog window where you can select one or more fields (and field-like items) to display in your view:
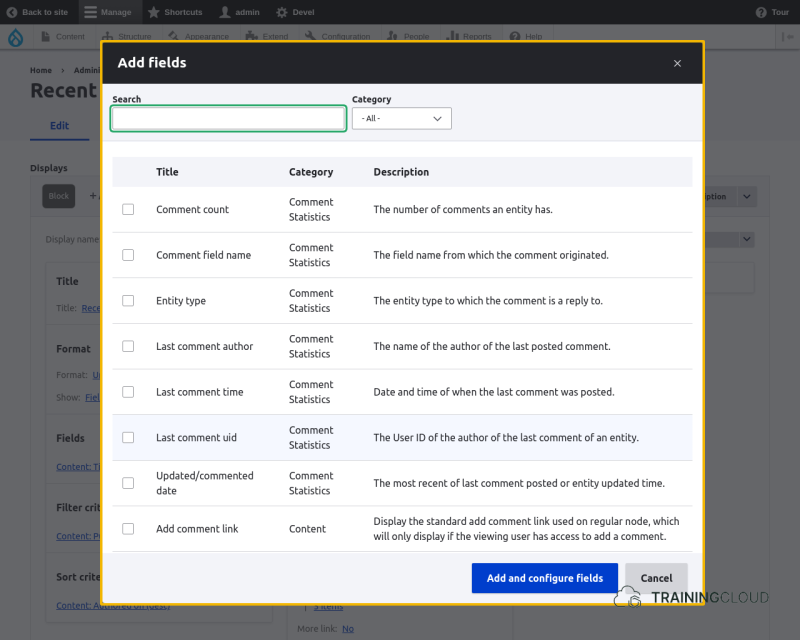
The fields and field-like items you can select are grouped into categories. To help you find the field you need, you can either use the search field (support for partial matches!), or select a category to narrow down the list.
In the list of available fields to add to your view, the same field can appear multiple times. In this case, it's important to look at the category: you most likely want to only ever add fields in the 'Content' category, and NOT in the 'Content revision' category.
You would only add fields from the 'Content revision' category if you're building a view of content revisions where you're displaying historical data, and earlier versions of content. This is a rare and advanced thing to do, and not covered in this course.
For each field you select, you'll be presented with field-specific configuration options once you click 'Add and configure fields'.
We highly recommend you use the default options for all fields for now. Once you've added all the fields you need and arranged them in the right order, you can go back and fine-tune each field's configuration as needed. It's easy to get lost in these options, so just stick with the default options until you're more familiar with the whole view creation process.
Activity 3
- To your Recent Articles view, add the following fields:
- Author
- Creation date
- Publication state (Search on 'publi' if you're having trouble finding this field)
- ID
When you want to add fields to the view, it's easy to accidentally click the 'Add' button on the 'Filter criteria' section. If you've selected fields but they're not appearing and/or your view no longer has any content to show, make sure you've added fields in the Fields section, rather than the Filters section.
Configuring Fields
Once added, you can (re)configure fields by clicking on them in the Fields section.
Here's an example of the 'Content: Title' configuration options:
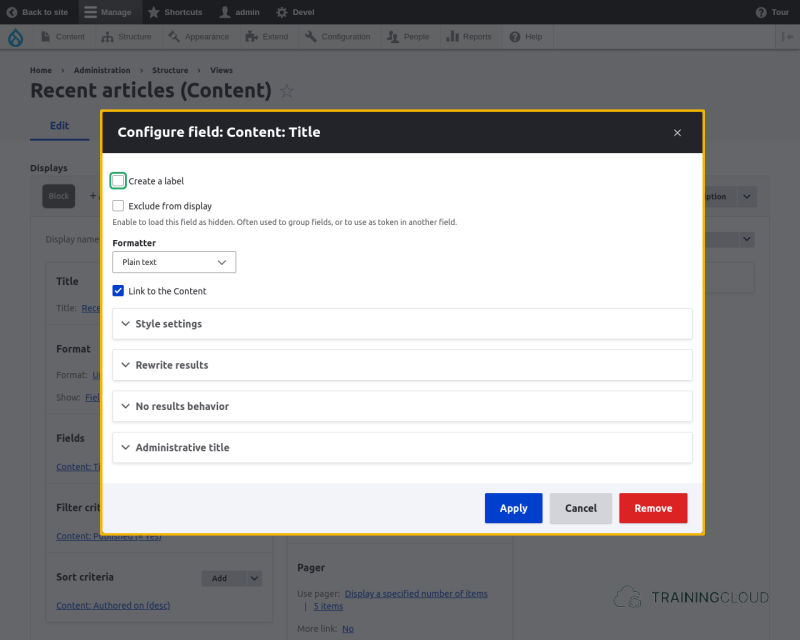
Each type of field will present different configuration options. This particular field is a text field, so the field formatter options are all related to text formats. Image fields will present image display options, date fields will present date formatting options, etc.
When you make changes to a field's configuration, don't forget to save the view as a whole as well.
Activity 4
- In your Recent Articles view:
- Change the 'Authored on' date format to 'YYYY-MM-DD' (example: 2020-09-28)
Activity 5
- In your Recent Articles view:
- Make the 'ID' field show a useful label, such as 'Article ID'
Activity 6
- In your Recent Articles view:
- For the 'Published' field:
- Show the label 'Publication status: '
- Make the field show 'published' or 'unpublished' instead of 'on' or 'off'
Rearranging Fields
Once you've added fields to your view, you can rearrange them by clicking on the arrow part of the 'Add' dropbutton in the Fields section, and then selecting 'Rearrange'.
This opens up a dialog window with the familiar drag and drop interface that lets you rearrange the fields.
Notice that this dialog window also lets you easily remove fields - an action you can otherwise only do by going into the configuration option of each field individually, and deleting the field there.
Activity 7
- In your Recent Articles view:
- Rearrange the fields so they are in the following order:
- Article ID
- Title
- Authored on
- Authored by
- Publication status
- Rearrange the fields so they are in the following order:
Block Settings
The Block Settings section has three settings:
This will appear as the name of this block in Manage >> Structure >> Blocks.
This will appear as the category of this block in Manage >> Structure >> Blocks.
You can expose certain view configuration options as block configuration options to let site editors fine-tune the block without having to (or being allowed to) reconfigure the entire view:
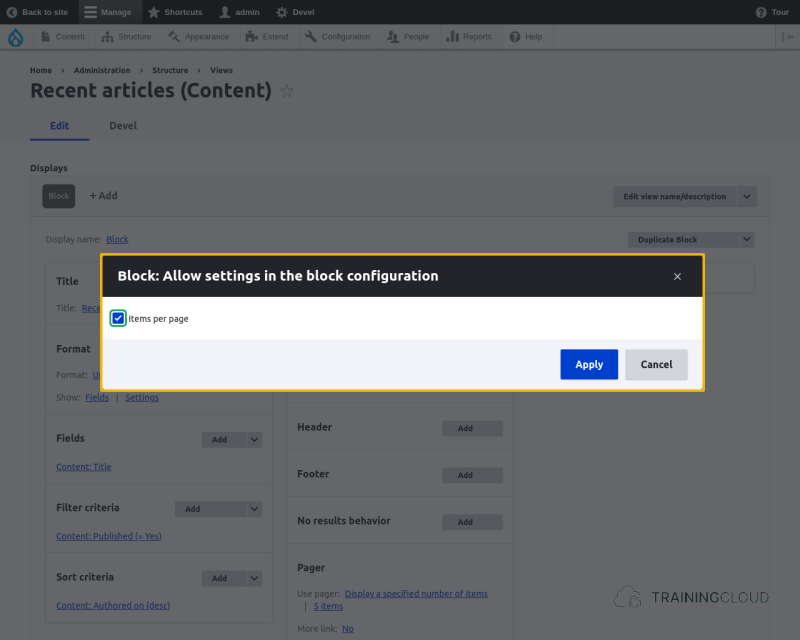
For instance, in your Recent Article view, the only setting available for you to expose as block configuration option is 'Items per page', which lets you specify how many items to show per page.
This setting is available because your view's 'Pager' section is set to show a 'specified number of items - 5 items.
Let's see these two side by side:
- View configuration on the left
- Block configuration on the right
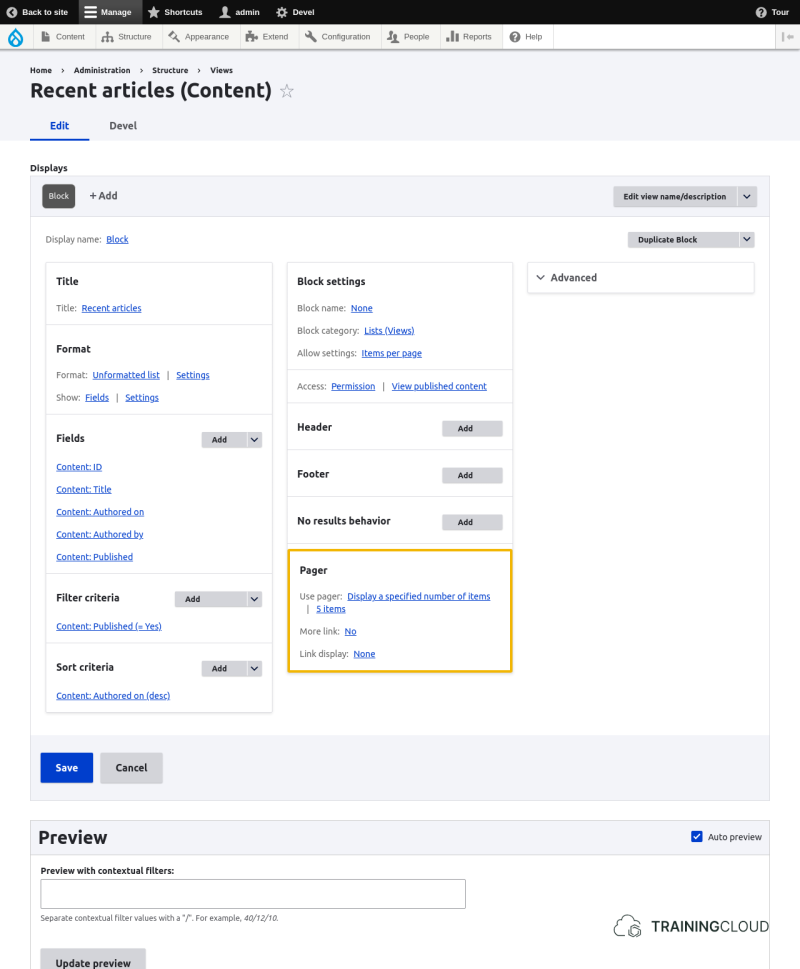
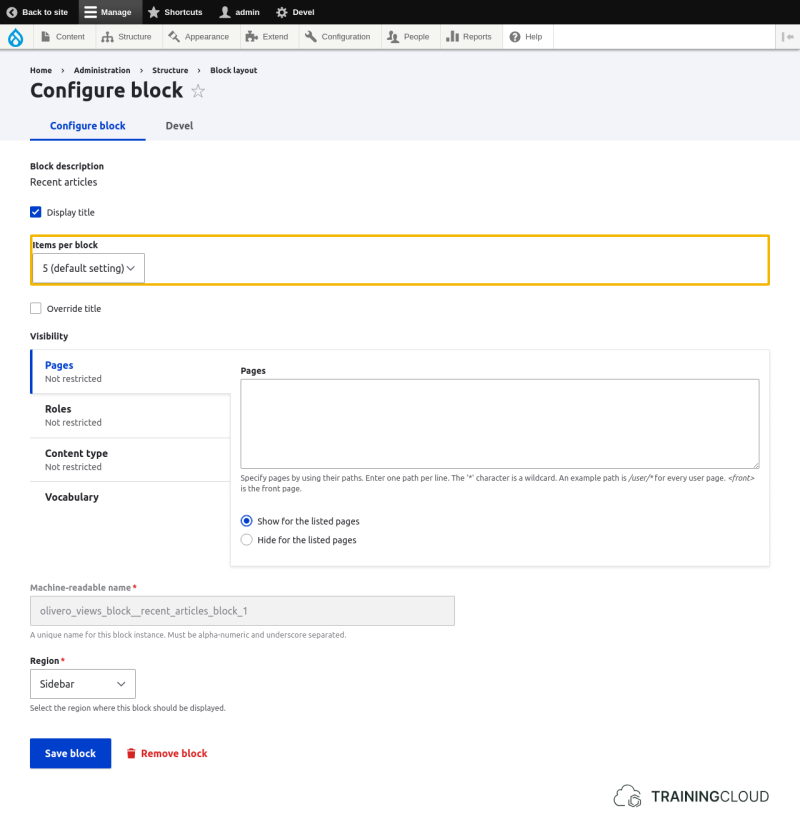
Depending on the complexity of your view and presence of other modules that provide additional features to views, you may be able to expose more view configuration options as block configuration settings.
Activity 8
- In your Recent Articles view:
- Set the number of results to show to 10
- In your recent Articles block (placed in a theme region as part of Activity 1), change the configuration options to only show 3 items.
Activity 9
- Add the Recent Articles block to your page again, this time in a different region.
- Notice the default number of items to show in the block's configuration option is now set to 10, since that's the value you specified in the configuration of the underlying view as part of Activity 9.
Summary
- Block Views and Page views are almost identical. One creates a page you can browse to, the other creates a block you can place in a theme region.
- For all types of views you choose to select and configure individual fields, or use the display options of one of the available view modes.
- For convenience, maintainability, and visual consistence across your site, use 'Show: Content'.
- For maximum power and flexibility, use 'Show: Fields'.
- Block Views can expose some of their configuration options as block configuration options.